Thrivecart is used by many businesses for building their sales funnels. They have many useful opportunities for digital marketers. However tracking implementation on Thrivecart is a pain. Thrivecart do not officially support Google Tag Manager.
Here there is the documentation on how to implement Facebook pixel and Google Analytics on Thrivecart.
But instead of implementing each pixel separatly it is always a better idea to have all the pixels configured in Google Tag Manager container. If you are not using Google Tag Manager yet here https://www.kl82.com/blog/google-tag-manager-basic-concepts-and-implementation-workflow you can read about the befinits it can bring to your business.
In order to use Google Tag Manager with Thrivecart you need to implement the following code for all of your products in the Tracking section:
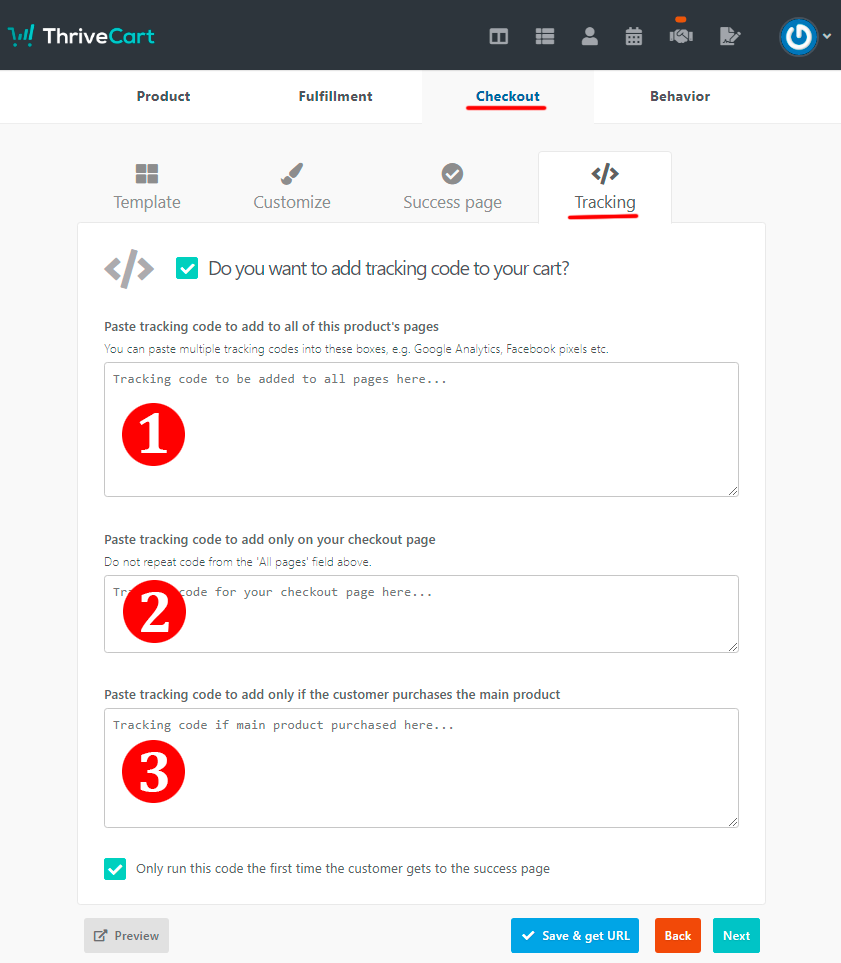
In the following snippet replace GTM-XXXXXXX with your GTM container id and paste it into section 1 (tracking code to add to all of this product's pages) pate the following code:
<!-- Google Tag Manager -->
<script>(function(w,d,s,l,i){w[l]=w[l]||[];w[l].push({'gtm.start':
new Date().getTime(),event:'gtm.js'});var f=d.getElementsByTagName(s)[0],
j=d.createElement(s),dl=l!='dataLayer'?'&l='+l:'';j.async=true;j.src=
'https://www.googletagmanager.com/gtm.js?id='+i+dl;f.parentNode.insertBefore(j,f);
})(window,document,'script','dataLayer','GTM-XXXXXXX');
<!-- End Google Tag Manager -->
<!-- Google Tag Manager (noscript) -->
<!noscript><!iframe src="https://www.googletagmanager.com/ns.html?id=GTM-XXXXXXX"
height="0" width="0" style="display:none;visibility:hidden"><!/iframe><!/noscript>
<!-- End Google Tag Manager (noscript) -->
<script>
(function() {
    if(typeof _thrive_order === 'undefined') return;
    var items = [];
    if(typeof _thrive_order.order.product !== 'undefined') { // Product block
        items.push({
            'id': _thrive_order.order.product.id,
            'name': _thrive_order.order.product.name,
            'quantity': _thrive_order.order.product.quantity,
            'price': _thrive_order.order.product.total_readable,
			'category':'main'
        });
    }
    if(typeof _thrive_order.order.bump !== 'undefined') { // Bump block
        items.push({
            'id': _thrive_order.order.bump.id,
            'name': _thrive_order.order.bump.name,
            'quantity': _thrive_order.order.bump.quantity,
            'price': _thrive_order.order.bump.total_readable,
			'category':'bump'
        });
    }
    var f = function(type) {
        if(typeof _thrive_order.order[type] !== 'undefined') {
            for(var x in _thrive_order.order[type]) {
                if(!_thrive_order.order[type].hasOwnProperty(x)) continue;
                items.push({
                    'id': _thrive_order.order[type][x].id,
                    'name': _thrive_order.order[type][x].name,
                    'quantity': _thrive_order.order[type][x].quantity,
                    'price': _thrive_order.order[type][x].total_readable,
					'category':type
                });
            }
        }
    };
    f('upsells'); // Handle all upsells
    f('downsells'); // Handle all downsells

	dataLayer.push({
		'event':'transaction',
	  'ecommerce': {
		'purchase': {
		  'actionField': {
			'id':  _thrive_order.order.invoice_id,                         // Transaction ID. Required for purchases and refunds.
			'affiliation': 'Thrivcart',
			'revenue': _thrive_order.order.total_readable,                     // Total transaction value (incl. tax and shipping)
			'tax':_thrive_order.order.tax_readable,
			'shipping': _thrive_order.order.shipping,
			'currency': _thrive_order.order.currency
		  },
		  'products':items
		  }
		}
	})


})();
</script>
Into section 2 code to add only on your checkout page paste the following snippet:
<script>
dataLayer.push({
		'event':'checkout',
		})
</script>
Google Tag Manager Configuration
Once this is done you need to configure your Google Analytics tags, triggers and events to capture the events from dataLayer.
If you have experience with GTM it should be an easy part for you.
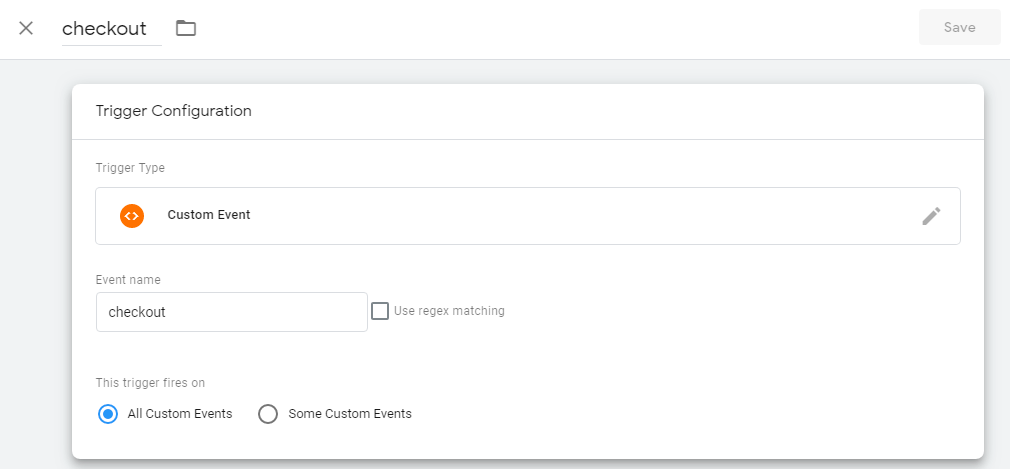
- Create a trigger for the checkout event:
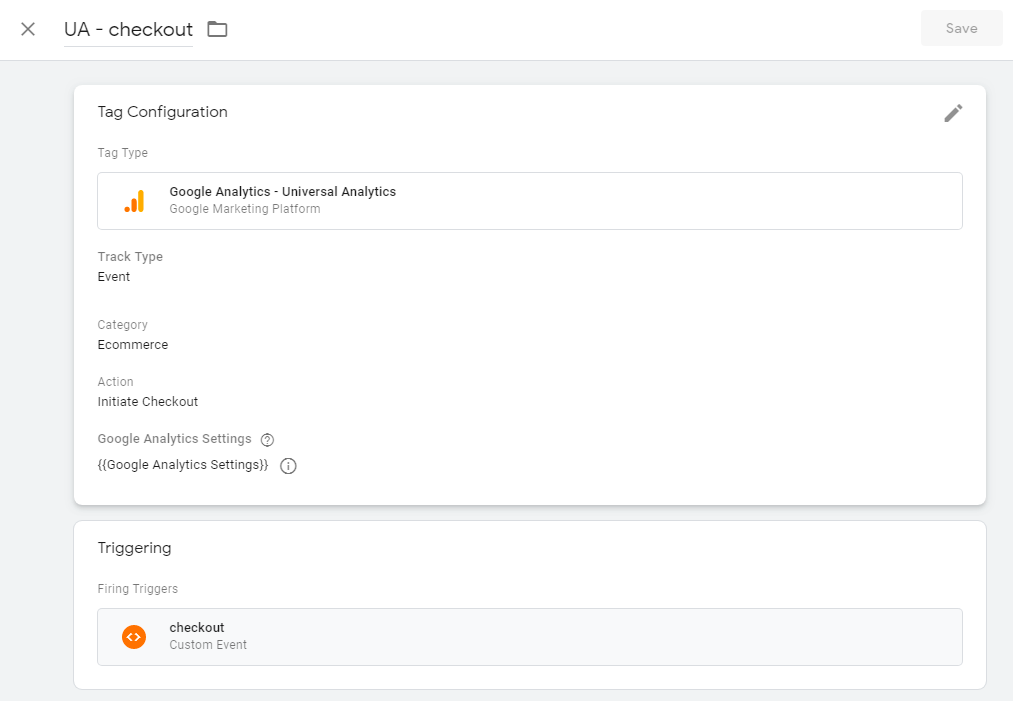
- Create Google Analytics tag for checkout and attach the checkout trigger to this tag:
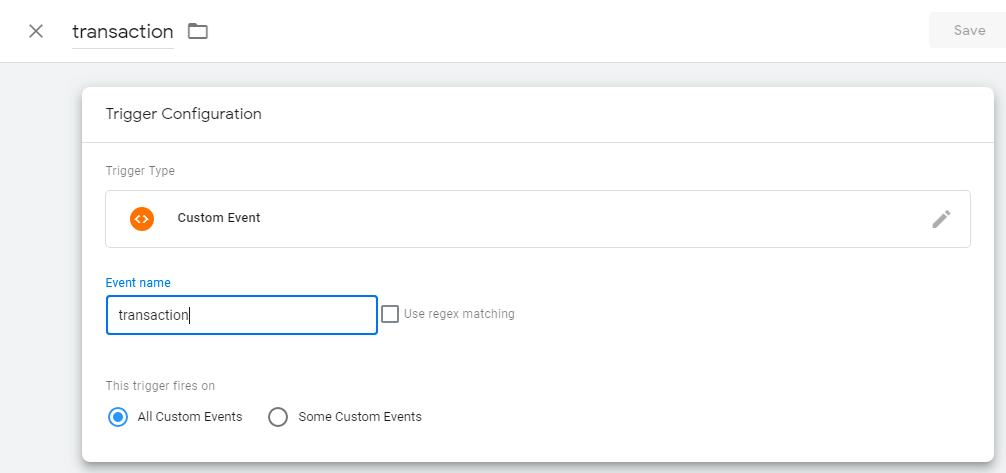
- Transaction a trigger for the transaction event:
- Create Google Analytics tag for transaction. Enable ecommerce for the tag and use dataLayer as source of the ecommerce data. Attach the transaction trigger to this tag:

- Preview, test and publish the container.
Done!
Leave a comment